
For most people who know how to clean an air duct themselves, getting an air duct professionally cleaned is no longer necessary because there are techniques that anyone can follow that guarantees a spotlessly clean air duct when the job is complete. All you need are a few tools and some self-confidence, and the rest is easy. First, get the following items ready before you proceed:
- Cordless drill
- Dust brush attachment for your vacuum cleaner
- Microfiber cleaning cloths
- Rotary dryer vent brush cleaner
- Vacuum cleaner with accessories hose
Next, following the steps below.
- Locate and Clean Your Registers
This is where you may need your cordless drill because wall registers are usually attached to the wall with screws. Remove all of your registers, the ones on your floors and the ones on your walls, and clean them. You can do this by placing them in warm, soapy water and cleaning them with a sponge. This will ensure that all of the dust, dirt, and other debris is properly removed from the registers. Let them dry while you continue on to the next step.
- Make Sure Your AC Fan is Turned On
Before you go any further, it is best if you turn off your heater and your air conditioner, but turn the AC fan to the “on” position. This will help move the dust along and make it easier and faster overall to perform the next steps. If you don’t have a “fan only” option, you can simply run your heater, but you’ll definitely want to make sure that the air conditioner isn’t on at any time.
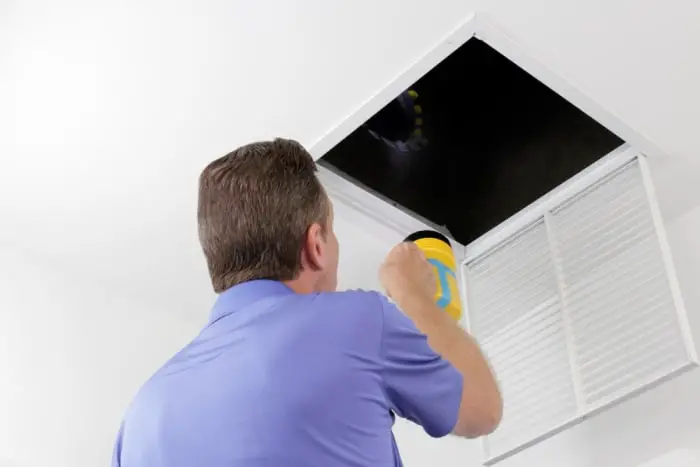
- Get Your Cordless Drill Ready
Place the dryer vent brush on the tip of your cordless drill. To ensure that it doesn’t come loose while you’re cleaning, make sure the dryer brush is attached tightly. Turn the drill on, and place it inside of the vents. This will loosen up the dried-on debris that is often stuck inside of an air duct. Use the drill throughout the length and depth of the vent, then turn off the drill before you remove it so that the debris doesn’t go everywhere.
- Time for the Vacuum Cleaner
With the vacuum cleaner hose, clean the inside of the vent well, making sure that you get everything on the inside and also around the outside of the vent. Clean the inside of the duct until you no longer hear anything being sucked into the vacuum cleaner. Make sure that you give it a thorough cleaning before you stop your vacuuming. If there is anything dried-on or stuck inside of the vent, you may have to take a sponge or pot-scraper and make sure that it is removed before you go to the next step. Just make sure that the inside of the vent is clean and clear of debris from top to bottom before doing anything else.
- Completion of the Cleaning Process
After thoroughly vacuuming the inside of the vents, take your cleaning cloth and wipe both the inside of the duct and the area around the outside of the ducts. This ensures that every bit of debris, dust, and other materials is removed. If you want your vents to run accurately and save money on your utility bills, they have to be spotless and free of dust and debris, and cleaning them regularly using this method is a simple and inexpensive alternative to hiring professionals to do the job for you.
- Go Ahead and Replace the Filters
Before you reinstall the registers, you might as well take this opportunity to replace your filters so that you have brand-new ones there. If you do this regularly, you should be able to enjoy nice, clean filters and ducts all year around. Cleaning your own ducts is much easier than you think, and it can save you a lot of money on your utilities twelve months a year.
- Reattach the Registers
Make sure that you reattach the registers tightly and firmly, and you can even give them a final dusting/cleaning once they’re in place. You want the outside of the vents to look as good as the ducts on the inside, so giving them a quick dusting is a good idea.
A Few Other Tips
- If you have a musty smell in your home, it could be the air ducts or filters that’s causing it. To remedy this, take a dryer sheet, preferably a scented one, and place it on your filter, but make sure you place it on the right side of the filter so that it doesn’t get sucked into the blower. You should also wait until you’re placing a brand-new filter inside the unit because that is when this method will work best, in other words, always place the dryer sheet in a brand-new filter, not one that is currently being used.
- In addition to saving on your utility bills, keeping your ducts clean helps everyone in your household breathe better, especially if they have allergies or respiratory problems, it creates a cleaner and healthier living environment, it improves the efficiency of the air flow through your home, it removes unpleasant odors and smells, and it reduces the number of irritants and allergens in the air.
- Air ducts do not have to be cleaned very often. Although filters should be replaced monthly, cleaning your air ducts only needs to be done once a year. Some people recommend every three to five years, but annual cleaning works best. If you’ve just moved into a home, go ahead and clean them right away because it is impossible to determine how long it’s been since the ducts were cleaned thoroughly. Cleaning your air ducts doesn’t take much time, and it’s an inexpensive procedure as well, so a once-a-year cleaning should never be a problem.
Even if you have no one in your home with allergies or respiratory problems, a good yearly air duct-cleaning is a good idea. If your home has pets, people with asthma, or anyone who smokes cigarettes or cigars in it, duct-cleaning becomes even more important. This goes for both homeowners and commercial entities, especially restaurants and bars, because in places like that, you have the added allergens caused by food, smoke, and cooking chemicals.