
For anyone suffering from respiratory difficulties, a portable oxygen tank eases distress. But do you know how to use a portable oxygen tank correctly? If not, then this guide will be of great help to you. You can use this aid to breathe while on the go or to remain more active. To make sure that you get the most out of the device, you need to learn its operation. Doing so will help you take care of any problems that may occur due to operation.
The Design and Configuration of the Tank
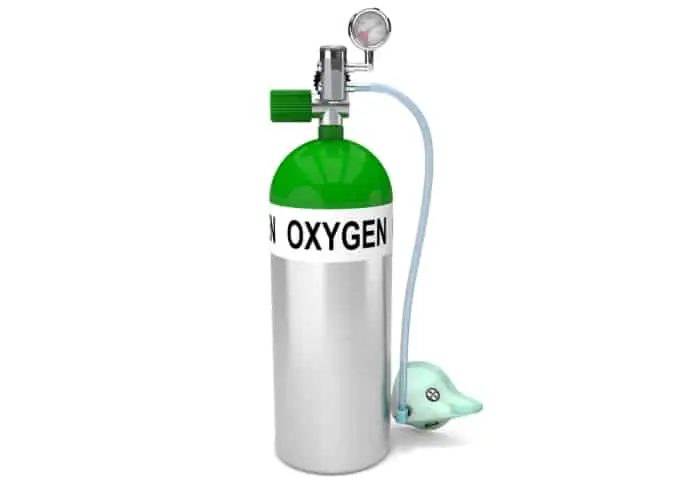
To learn how to use the tank, you need to understand how it is designed and what it holds. A portable oxygen tank holds medical-grade oxygen. This natural gas is compressed into a cylindrical tank to 2000 psi. Some of the tanks can hold up to 3000 psi.
A regulator appears at the top of the tank to regulate the oxygen output. The regulator reduces the psi count to about 50 psi This same component also shows the pressure in the cylinder and controls the oxygen flow rate. A doctor orders the flow rate per a prescription when the patient receives the oxygen tank. You can establish the prescribed flow rate by simply turning the knob.
Portable oxygen tanks differ in size. While larger cylinders hold more oxygen and last longer, smaller tanks, as you might guess, hold less oxygen and must be replenished more often. The size of a cylinder and how it is used is dependent on the activities and of a patient and the prescription written by his or her doctor.
Today’s portable oxygen tanks are much lighter because they use lighter-weight materials and display a more streamlined design. Tanks in the past could weigh as much as 30 pounds and were reinforced and made with steel. Portable models often featured wheels and could be difficult to navigate. Today’s oxygen tanks are made of aluminum and can be carried easily.
How To Use A Portable Oxygen Tank Correctly
A portable oxygen tank has a number of parts which must be connected correctly for it to function properly. To use this type of portable device, you need to do the following:
- Attach the Regulator for the Tank
Before you do anything, remove the tape from the tank’s valve stem. Open the valve just slightly. A small rush of air will escape. Quickly close the valve. Performing this task removes any dust. Make sure that you point the valve away from yourself or anyone else when you undertake this step.
Next, review the regulator to see if it displays a washer. If a washer does not exist, a large amount of oxygen can be lost if you open the valve. Call the supplier of the tank if your tank does not display this important part.
Slide the regulator across the stem so you align the two regular pins with the holes of the valve stem. The regulator has been seated correctly once the two pins easily slip into the holes. Tighten the pins with the regulator’s T bar.
- Prepare the Tank for Operation
Gradually open the valve of the tank by turning it counterclockwise. You can do this by using a toggle bar or an oxygen wrench. When you perform this step, you should see the reading of the pressure gauge increase. Again, a full tank should contain 2000 psi of oxygen. If you opened the valve of the tank and the contents needle remained inert, you need to use another tank as the one you are using is empty. After you open the valve, set the flow rate at the prescribed setting or flow rate. Attach the tube to the regulator outlet.
- Position and Fit the Cannula
Place the tank’s cannula on your face, adjusting for comfort. The nasal cannula fits into the nose, thereby eliminating the need to wear a bulky and uncomfortable mask. Make sure that you choose the right size cannula. Otherwise, the wrong fit can lead to chafing or pain.
Most cannulas are made for infants, children, or adults. Therefore, you can always find a size that will accommodate your breathing needs. The cannula you use should fit snugly but not too tight in the nostril. Make sure that it does not go too far back into your nostrils. Some brands of cannulas feature expanded size options such as adult sizes in small, medium, and large.
You should discontinue wearing the cannula if any of the following applies:
- The cannula rubs against your nostrils. Any type of friction indicates that the size you have chosen is too large.
- The cannula pinches the nostrils, which is a strong indication that it is too small.
- Attach the Cannula to the Oxygen Tank
Once you find a cannula that fits, you need to attach the tube to the oxygen tank. You can affix the tubing to a connector that latches onto the tank. Attach the connector to the end of the line to connect the tubing. Also, make sure that the connection fits tightly onto the oxygen line so the oxygen will not escape. Position the connection next to your arm to test for any leaks. You can also smell any oxygen that escapes.
- Adjust the Oxygen
Again, you need to adjust the flow rate per the prescription of your doctor. Always make sure that you turn the dial to the prescribed number. Never make any changes unless prescribed by your doctor. If you change the flow rate yourself, you could end up getting more or less oxygen than you require. To avoid any complications along these lines, use a pulse oximeter to track your oxygen use. If the reading displays 100%, turn down the oxygen a bit.
- Make Sure the Cannula’s Prongs Face Downward
Most cannulas feature curved prongs so they fit more easily within the nostril. Always hold the cannula so the prongs face upward before curving them downward. If the cannula does not feature curved prongs, hold the tube so the prongs point upward and then slant them toward your body.
- Fit the Prongs Inside the Nose
Place the prongs and the cannula. If the cannula is placed right, you should sense a gentle air flow. Also, if the cannula is properly sized, the prongs should comfortably fit inside the nose. Once you fit the tube inside your nose, you need to lift the cannula tubing and place it snugly but not too tightly over the ear. By taking this approach, you can maintain the position of the cannula regardless of what you are doing.
If you find that looping the tubes behind your ears proves to be uncomfortable, you may want to include a headset behind you. Instead of placing the tubing over the ears and beneath the chin, place the cannula so the tubing runs from the nostrils toward the back of the neck and position the slider at the bottom of the neck.
- Adjust the Slider
Move the slider for the tubes to make the proper adjustment. The slider permits you to tighten or loosen the headset by moving it up or down. For a good fit, the slider should be placed just under the chin. To make that sure it fits correctly, see if you can place two of your fingers between your chin and the tubing. Loosen the cannula if it makes impressions in the skin.
- Use a Saline Spray
Sometimes the nasal passages will dry out when you are using a cannula. If this happens, you should use a saline spray to add moisture to the nostrils. If you have ongoing problems with dried-out nostrils, add a humidifier to your oxygen tank. This can be done as a direct attachment.
- Attach a Humidifier Bottle
If you want to moisten your nostrils, you can add a humidifier bottle to keep them from drying out. The oxygen tank, when connected with a humidifier bottle, collects the excess moisture in the bottle. To use the bottle, you should fill it with distilled water to the fill line. Do not surpass the fill line. Affix the humidifier cap for the bottle. Make sure that you tighten the cap carefully so it is secured. Do not cross-thread the connection as doing so can trigger leaks.
Affix an inlet nut to the outlet for the oxygen system before hand-tightening it. You may also add a humidifier adapter. It just depends on the oxygen tank. Test the humidifier for leakage. You can do this by setting the flow rate for the machine to about four liters or higher and blocking the outlet for the humidifier. The safety valve should either whistle or pop in response. If this does not happen after about 15 seconds, you should inspect the lid and bottle to make sure that the connection is tight.
After you attach the humidifier bottle, connect the extended tubing to the outlet for the humidifier and switch the flow rate to the prescribed amount. You will need to blow out any excess water from the tubing from time to time. This will help keep your humidifier system in good working order. To facilitate the process, disconnect the tube from the humidifier bottle. Link the tube to a backup tank or concentrator.
Increase the flow to the optimum air flow setting. Doing so will force the excess water out of the tube. Once the tube clears of water, turn the flow to the proper setting or the regulator for the tank to the position of “off”.
Clean the Bottle Every Week
Reinstall the oxygen tube to the humidifier container or link it to the concentrator. Every week, make it a point to clean the humidifier bottle after disconnecting it. Bottles should be cleaned with fresh, soapy water before they are rinsed and refilled with distilled water. Make sure that you know how to assemble a humidifier bottle, lest your bottle springs leaks or the prescribed oxygen is not being adequately used.